HTML5 Images – The IMG and PICTURE Tags
Now you know how to structure a basic HTML5 page. Let’s go ahead and start to make it look pretty.
Quick Links: The <img> Tag | The <picture> Tag
The Importance of Images in Web Design
If the current era of Social Media has taught us anything it is that people are visually driven. People will engage with pictures and videos significantly more than they will rafts of written content.
This should not detract from the importance of writing in-depth, compelling text, but does mean when you are creating a page on a website, you need to consider it being as multi-media as possible. This means, if appropriate, adding audio or video will also help keep users on your page longer. Creating video takes a lot of effort (unless you’re already skilled and equipped!) but adding audio can be done through various streaming services. On a site we run, we use SoundCloud – the paid version is well worth it.
HTML Attributes
Before going into placing images into your HTML5 page, I need to introduce you to a new concept – HTML attributes. These are variables you can change on a tag which alter how that tag looks, or behaves.
So, before CSS became mainstream (which didn’t take long), you could easily alter the font on a page like this:
<font face="Arial" size="3" color="#ff0000">Red Font, in Arial Typeface, at scale '3'</font>
So you can see the open and close <font> tags but inside the open tag there are a number of attribute="value" pairs. These are HTML attributes. Technically speaking these attributes do still work, but it it is not best practice, at least where font definitions are concerned.
But it is a good way to introduce HTML attributes to you. So go ahead and edit your basic HTML5 page and play around with fonts. I will add a font tutorial shortly.
Correct Usage of Attributes
There are a couple of important points about HTML attributes:
- Ensure there are no spaces between your attribute and the value: This means
attribute = "value"is invalid syntax. Neither isattribute= "value"always make sure that your syntax looks likeattribute="value" - It is safer to use speech marks for your values: technically, if your value is just one word then you can omit the speech marks, but as many values (such as font names) have multiple words you must use speech marks.
face=Arialwill work, but take the font Trebuchet MS, if you specifyface=Trebuchet MSthe page will try to find the font ‘Trebuchet’ but ignore the ‘MS’. So for consistency always use speech marks for attributes.
How to Insert Images and Pictures in HTML
The <IMG> Tag
Building on this idea of attributes I can introduce you to the IMG tag. To insert an image in a page you can use the following HTML snippet – I will explain each attribute in turn.
<img src="/images/my-company-logo.png" width="450" height="300" alt="My Company Name" title="My Company Name" align="right" hspace="5" vspace="5">
Firstly, do note there is no </img> tag. Okay here are the attributes:
The src Attribute
This stands for ‘source’ – i.e. where is your image file? This can be an image file on your own website, or on another website, or on a CDN (Content Delivery Network).
If you are embedding an image from your own site, you can specify the full URL to the image or, as in this example, a path relative to the root of your website. If you are using files on your own computer with these HTML5 tutorials, then you can either use the full folder path to the image, or you can use a path relative to where your .html file is.
This makes your options something like this:
src="http://www.domain.com/images/my-company-logo.png"– the full URL to the imagesrc="http://www.not-my-website.com/images/their-company-logo.png"– a URL to an external site’s imagessrc="images/logos/my-company-logo.png"– take the location of my .html file, find a folder in the same location called ‘images’, then look for a folder in ‘images’ called ‘logos’, then find ‘my-company-logo.png’
Valid File Formats
There are quite a large array of image formats these days. However, the most common ones used in an <img> tag are
- GIF: hsa a limit to the number of colours you can use, but supports animation and transparency
- JPG or JPEG: no limit on the number of colours but does not support transparency.
- PNG: creates a high quality image, which can lead to a high file size, but supports transparency.
There are other formats but these are enough to get you started.
Embedding Images From Other Websites
Before you consider doing this, please make sure that, first and foremost, you have the right to use that image. Reaching out to the site to ask permission would be a good starting point.
Another consideration is that their server may prevent you doing this. Embedding another website’s images is called hotlinking and uses another person’s bandwidth. For that reason always look to host the images on your own web hosting, or subscribe to a CDN.
The width and height Attributes
Sounds obvious, but this sets the height and width of your image. This is measured in pixels, but you can equally specify a percentage for the width element.
If you do not specify a height and a width, your browser will attempt to load the image and the size it has been created. I say ‘attempt’ because CSS can limit how large an image can be. Also another limiting factors might be the width of a table cell. So you are better to take control of your page and define the height and width of your image.
The alt Attribute
alt is short for ‘alternative’ and should be used as a text description of your image. This serves a couple of purposes:
- Accessibility: Providing a text description of your image will help those who browse either with images turned off, or with screen readers (for those with eyesight challenges) to understand what that image is.
- SEO: Search engines use the
altattribute to help determine the nature of the image and helps those images to show up for relevant queries in image search results. Carefully implementing this can also influence how the page the image is on to rank for relevant terms.
The title Attribute
The title attribute will display a ‘tooltip’ when someone hovers their cursor over the image. Again this should be descriptive, but best to keep this shorter than the alt attribute as tooltips tend to flash up for only a few seconds.
The align Attribute
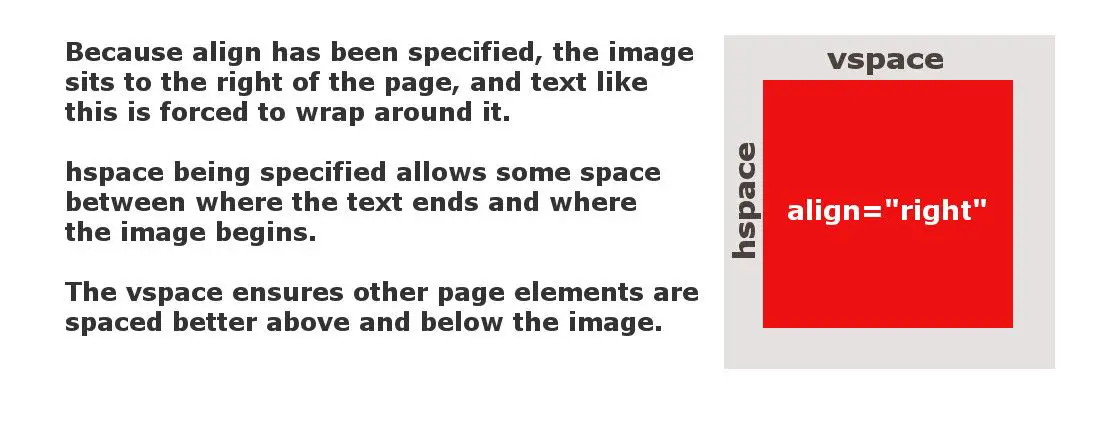
The align attribute determines where on your page the image will sit. If you do not specify an align attribute, then it will align to the left of your page but your text will not wrap around your image.
You can specify left, right, or center but support for center is patchy and cannot really be relied on. I will cover in the CSS Tutorials how to force this center alignment.
If you specify left or right then your image will sit on the appropriate side of your page and your text will wrap around the image, at least within the limit of the size of the browser window loading the page.
hspace and vspace
These two attributes give your image space, so that there is a gap between the image and the elements around it. Here’s a demonstration of how align, vspace and hspace work:

So now you can go ahead and experiment with putting images onto your test page!
Image Not Showing Up?
If you have specified all your attributes and your image does not show, check the following:
- Have you saved your .html file and reloaded the browser?
- Is your
srcURL actually correct? In the case of full URLs you can copy and paste it into a new browser tab and check the image loads. If you’re using a relative path, you will need to manually check your folder structure. - Have you used the correct case of your URL? Your computer might have upper and lower case letters, but some servers may accept the same filename regardless of whether you have used upper- or lower-case letters.
- Have you saved the image file correctly? In Photoshop for example you can accidentally add a
.jpgending to a file but not select ‘JPEG Image’ from the ‘file type’ drop-down. This effectively creates a filename you think you can use, but isn’t a real.jpgfile!
Page Load Time
You can use as many images as you want on your page. But bear in mind that the more you use, and the larger images you use, the slower your website is likely to load. A detailed examination of image optimisation will have to wait for another time, although you can refer to this article in the mean time.
Suffice to say that you need to use the appropriate size image files: photos taken on a camera can be thousands of pixels wide and at a high resolution. You should use a graphics package such as Photoshop or GIMP Editor to reduce the dimensions, resolution and filesize down.
Once you’ve done that, you could use compressor.io or tinypng.org to help reduce your file sizes down, which helps your pages load quicker.
HTML5 <Picture> Tag
As these are supposed to be HTML5 tutorials, it would be remiss of me to ignore the new <picture> tag. There is a great example over at HTML5 Hub of how to set up the Picture Tag
<picture> <source media="(min-width: 64em)" src="high-res.jpg"> <source media="(min-width: 37.5em)" src="med-res.jpg"> <source src="low-res.jpg"> <img src="fallback.jpg" alt="This picture loads on non-supporting browsers."> <p>Accessible text.</p></picture>
This allows you, where the browser supports it, to specify different images for different screen sizes. So, your first two <source> tags define the minimum width the screen needs to be to display that image. This paves the way for responsive images. If you have a completely different image you want to show to phone users, you can.
The <picture> tag still contains a normal <img> tag in case someone tries to load your page on an old browser, so they see an image of some description.
TL;DR HTML and Images
You can choose to use either the IMG Tag or the PICTURE tag. In the latter case, you’ll need to create multiple images/sizes to suit different screen sizes. That sounds a lot of work but will speed up your page load time on smaller/slower devices such as mobile phones.
