
How to Style Your Forms Using CSS
Pre-requisite: if you are learning from scratch and haven’t yet learned HTML Forms, head over there first and then come back! This tutorial on how to style your forms using CSS will build on that tutorial (or previous knowledge).
Okay with that out the way, let’s get started.
Forms Are Necessary…but boring!
Despite new technologies such as Social Media Sign-in and voice search (e.g. Siri or OK Google) form are a necessary part of the web. From enquiry forms, to email address captures, to your online banking, the need to enter information is the longest-standing method of adding user interaction to a website.
The problem is that forms, if not styled (or designed) are both boring to use and boring to look at. And if your forms are dull, you could lose enquiries, sales, sign-ups or whatever your key conversion metric is.
But the reality is that without using CSS, your forms will look ugly!
So we are going to look at some simple CSS styles that can help bring a consistency to your forms and give you more control over your form design.
Text Boxes, Email and URL Inputs
Since the birth of HTML5, the number of single-line inputs has grown from just <input type="text">. For example type="email" and type="url" are now valid ‘text’ boxes but do not allow the form to be processed until the correct format has been supplied (dependent on browser-support).
So let’s apply some basic formatting to our text boxes. We could use CSS Classes, but we can be smarter than that:
input[type="text"],input[type="email"],.input[type="url"]{ width:100%; height:25px; line-height:25px; color:#333; background-color:#fff; border:1px solid #236; border-radius:3px; padding:3px;} By using the input[type="text"] we can target any HTML tag that has <input type="text">. This format can be used to target any input type, including the new HTLM5 input[type="date"] for example. Because we have used a comma list, we can apply the same rules to all items in the list.

We have used CSS Padding to make sure the text doesn’t hit the edges of our box and border-radius to give them a slightly rounded corner.
Note: you may have to define your font-family for inputs and often the browser will use its own defaults if you don’t.
SELECT Boxes and CSS
You can apply most of the rules for text boxes to your SELECT drop-down boxes as well. However it may need some tweaking in terms of the width and/or line-height to make it consistent with your text boxes. Here’s the screenshot in Google Chrome if you just apply the rules above: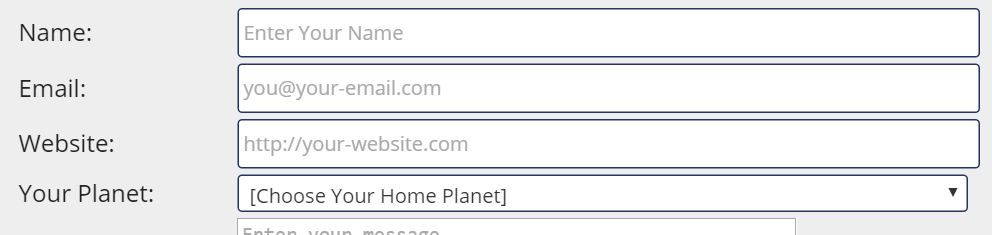
- In the case of the width you will have to tweak this for your specific form. In my case it was easier to set my HTML Table as an abolute size (in pixels) rather than a relative size (in percentages). Then I could tweak the width until it was right.
- For height, a select box ignores line height so I just needed to create a new line for the select input type and adjust the height.
Here’s my revised CSS:
input[type="text"],input[type="email"],.input[type="url"],select{ width:100%; height:25px; line-height:25px; color:#333; background-color:#fff; border:1px solid #236; border-radius:3px; padding:3px;}select{ height:30px; width:407px;} HTML TextArea Inputs
Because TextAreas are not an input tag, they will need defining separately. Because CSS Cascades, you can still apply the rules for the input types to a textarea and then make any tweaks you need to. In HTML, <textarea>s have their width set by the cols attribute, which gives a different width depending on the relative size of the font letters in your typeface. This can lead to inconsistent widths between a text input and a textarea.
For consistency, it’s good practice to keep form elements the same width where possible..
Fonts and CSS TextArea
A strange behaviour of textarea tags is that they usually have a ‘fixed-width’ font by default – such as ‘Courier New’ for example. This means you will need to set a font-family on your textarea to make it the same as your single-line text boxes. Whether you link to Google Fonts or use @font-face you will still need to add it to your textarea definition.
How to Prevent Resizing on TextAreas
Many browsers now allow users to resize a TextArea. This can be helpful if people want to see more of what they’re typing at once. But you may want to re-control this and stop this behaviour. To prevent resizing on your text area tags simply add resize:none; to your CSS.
So, to add our textarea definitions, here’s the CSS Code:
input[type="text"],input[type="email"],.input[type="url"],select,textarea{ font-family:'Open Sans'; width:100%; height:25px; line-height:25px; color:#333; background-color:#fff; border:1px solid #236; border-radius:3px; padding:3px;}textarea{ height:75px; resize:none;} Styling Form Buttons with CSS
Whether you’re using HTML5’s <button> tag or, if you’re stuck in your ways (like me!) and use an <input> tag, you want to bring some consistency between your clickable/pressable elements. If you’re using input types, there are 3 key variations to consider:
- input[type=”button”]
- input[type=”submit”]
- input[type=”reset”]
For normal HTML, you’re unlikely to use the first one as that’s often linked in with JavaScript functions, or other dynamic elements. Submit is required. Reset is optional. So here are some example settings you could use to apply CSS to your buttons:
input[type="button"],input[type="submit"],input[type="reset"]{ border-radius: 5px; border:0; background:#235; color:#eee; line-height:27px; height:30px; float:right; cursor:pointer;} Control Your Borders: If you do not define a border attribute in your CSS, then each browser will add one and that can look different across different browsers. So you should define your own border, or in this case, set border:0; so that your User Interface (UI) looks consistent regardless of device or browser!
The cursor Attribute: only relevant for desktop/laptops of course, but if you want make it obvious that your button is something to be interacted with, then cursor:pointer; changes the cursor from an arrow to a ‘pointing hand’ icon. There are other values for cursor but they’re beyond the scope of this tutorial.
Floating Your Buttons: to understand floats a bit better see our tutorial on web page layout without tables or frames. But because of how float works the order of your buttons in your HTML matters:
<!-- will put submit to the right of reset --><input type="submit"><input type="reset"><!-- will put reset to the right of submit --><input type="reset"><input type="submit">
Removing the Border ‘Glow’ on Active Form Fields
To further control how your form looks, you may want to remove the ‘blue glow’ that happens by default in most modern browsers. You may instead want to define a different border colour, or background-color. To remove the glow ensure you cover all input types you have used and apply the outline:none; attribute:
input,textarea,select{ outline:none; } Changing the Currently Active Form Field
The last bit I will cover in this introduction to Forms and CSS is how to add some interest into the currently-selected form field. This makes use of CSS pseudo-elements. So far we have just looked at affecting HTML tags with CSS. I will do a more in-depth tutorial on pseudo-elements later, so this is a quick introduction.
When a Form Field has the ‘Focus’
To define how a text box (or other element) looks when someone has clicked it (or clicked ‘into’ it to edit it), you need to use this method: tag:focus{ }. This allows you to reset any aspect of appearance only while the user is interacting with that form field:
input[type="text"]:focus,input[type="email"]:focus,input[type="url"]:focus{ background:#000; color:#69f;} This gives us an effect like this:

When the Cursor is Over a Button
For desktops/laptops you can also change any CSS attributes when the cursor is over an element, known as hovering. Instead of using focus we used above, we use hover instead:
input[type="submit"]:hover{ background:#69a; font-weight:bold;} You can apply this to most other form elements if you want, to help make it clearer which form element someone is about to click into.
TL;DR Styling Your Forms With CSS
This is a huge topic and this is just an introduction to it. But hopefully you have learned enough here to go away and have a play around with the code yourself. You can download the demo file by pressing the button below – play with it to your heart’s content.
At the end of the day, you want to make your website’s forms interesting and interactive. Doing so makes the likelihood of someone filling out your form greater and keeps people on your website longer, which can only be a good thing!
Download the Demo File for CSS Forms
If you have any questions, feel free to use the comments and I’ll do my best to reply. Happy Coding!
Spread the Word


